Effortless Replacement of Grammer Driver Seat Cushions: A Simple Guide
Introducing our comprehensive guide on the easy replacement of Grammer Driver Seat Cushions, crafted to improve your driving experience. In the world of long-haul trucking, agricultural machinery, or any job requiring long hours at the wheel, comfort is a top priority. Grammer, a well-known name in ergonomic seating solutions, knows the importance of comfort and durability.
Learn how to upgrade your Grammer Driver Seat Cushions for maximum comfort. We'll guide you on replacing cushions and when to consider upgrading the chair. Whether you're a professional driver or seeking better seating, this guide has you covered.
Easy Steps to Upgrade Your Grammer Driver Seat Cushions
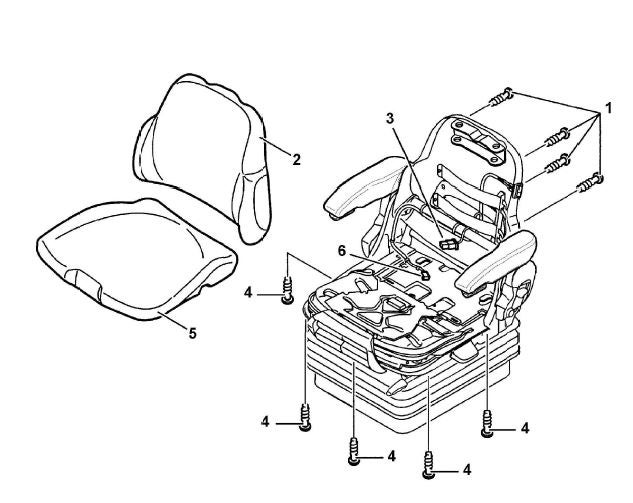 (1) Screw
(2) Backrest Cushion
(3) Backrest Cushion Plug Connection
(4) Screw
(5) Seat Cushion
(6) Seat Cushion Plug Connection
(1) Screw
(2) Backrest Cushion
(3) Backrest Cushion Plug Connection
(4) Screw
(5) Seat Cushion
(6) Seat Cushion Plug Connection Step 1: Unscrew the Screws
Start by unscrewing the screws (1) that secure your Grammer Driver Seat Cushions. These screws hold the cushions and backrest securely.
Step 2: Disconnect Seat Heating (If Applicable)
If your seat has heating, carefully pull the backrest cushion (2) slightly forward. This lets you access the connection between the backrest cushion (3) and the seat heating. Disconnect this connection for safe removal.
Step 3: Remove Backrest Cushion
After disconnecting, proceed to remove the backrest cushion (3) from the seat. This step is crucial to access cushions for replacement or maintenance.
Step 4: Remove Front Screws (No Length or Tilt Adjustment)
If your Grammer seat lacks length and tilt adjustment, remove the three front screws (4) holding the cushions. These screws must be removed for cushion replacement.
Step 5: Remove Side Screws (With Seat Length and Tilt Adjustment)
For seats with length and tilt adjustment, you'll find four side screws (4) securing the cushions. Unscrew these side screws to remove the cushions.
Step 6: Remove Seat Cushion (If Applicable)
If your Grammer seat includes a separate cushion (Step 5), you can now take it out. This is key in the replacement process.
Step 7: Installation
Reinstalling your Grammer Driver Seat Cushions is done in reverse order. Follow the above steps backward to securely attach new cushions and backrest, restoring your seat's comfort and function. Ensure all screws are tightened to 3.5 Newton-meters (Nm) for secure fixation.
Following these clear steps will help you effortlessly replace your Grammer Driver Seat Cushions and ensure a comfortable driving experience.
Insightful Tips on Replacing Grammer Driver Seat Cushions
Expertise comes from learning, whether through trial and error or training. Always check the manufacturer’s guide. You can also talk to your Kramp product specialist or find a Kramp dealer near you.